A slowed + reverb song is two edits stacked together: play the track back slower, which lowers its pitch and stretches every note, then add reverb so it sounds like it is filling a big room. Getting a version that sounds good, rather than just slow and blurry, comes down to a handful of choices. This guide walks through each one using the free slowed + reverb generator, which runs in your browser on both phones and computers.
Music: “Tender Moment” by John Bartmann (CC0 1.0). Every version was made with this tool and volume-matched to the original. Switching keeps your place in the song.
What you need
- A song file on your device: MP3, WAV, FLAC, M4A, OGG, AIFF and most other audio formats work, and so do video files such as MP4 or MOV (the audio is used).
- A current browser: Chrome, Edge, Safari or Firefox, on a computer, phone or tablet.
- Headphones. Reverb tails and low end are hard to judge on phone or laptop speakers.
You don’t need an account or an app. The song is decoded and processed inside your browser tab, so it is never uploaded and there is no file-size limit beyond your device’s memory.
Step 1: choose a good source file
This matters more than most people expect. Slowing a song down and washing it in reverb exaggerates whatever is already in the file, including the faint swishy artefacts of heavy compression. A low-bitrate MP3 that sounds fine at normal speed can sound watery once slowed.
| Source | Result after slowing |
|---|---|
| WAV, FLAC, AIFF or ALAC (lossless) | Best. Nothing extra to expose. |
| MP3 320 kbps or AAC 256 kbps | Very good. Hard to tell from lossless in most edits. |
| MP3 192 kbps | Usually fine, small loss of clarity in cymbals. |
| MP3 128 kbps or lower | Often audibly swishy or metallic in the highs. |
| Audio ripped from a re-uploaded video | Unpredictable; often already compressed several times. |
If you only have a low-quality file, you can hide some of the damage later by lowering the high cut to 10–12 kHz. Songs with a clear vocal, a strong melody and not too much going on at once generally make the best edits: ballads, R&B, mid-tempo pop and melodic rap all slow down well.
Step 2: open the song
On a computer
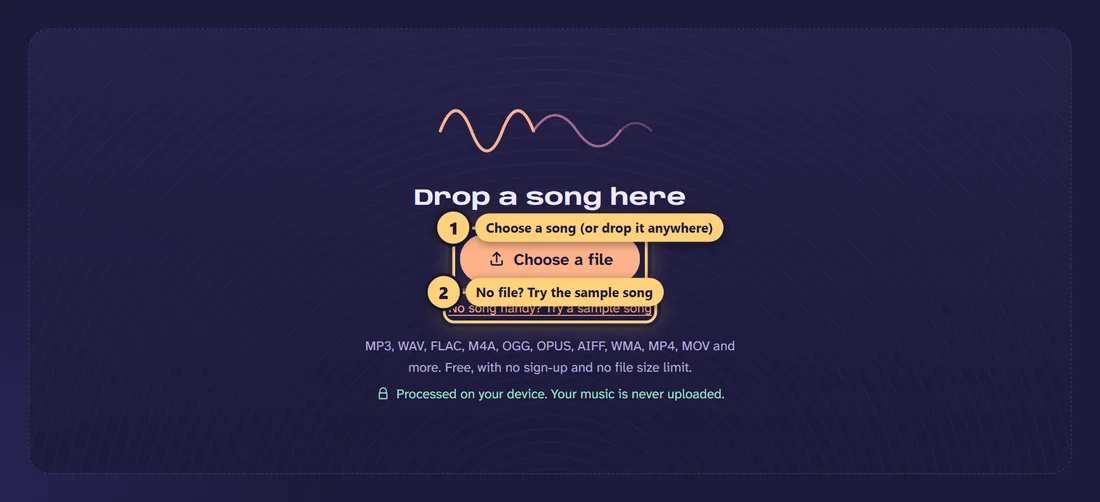
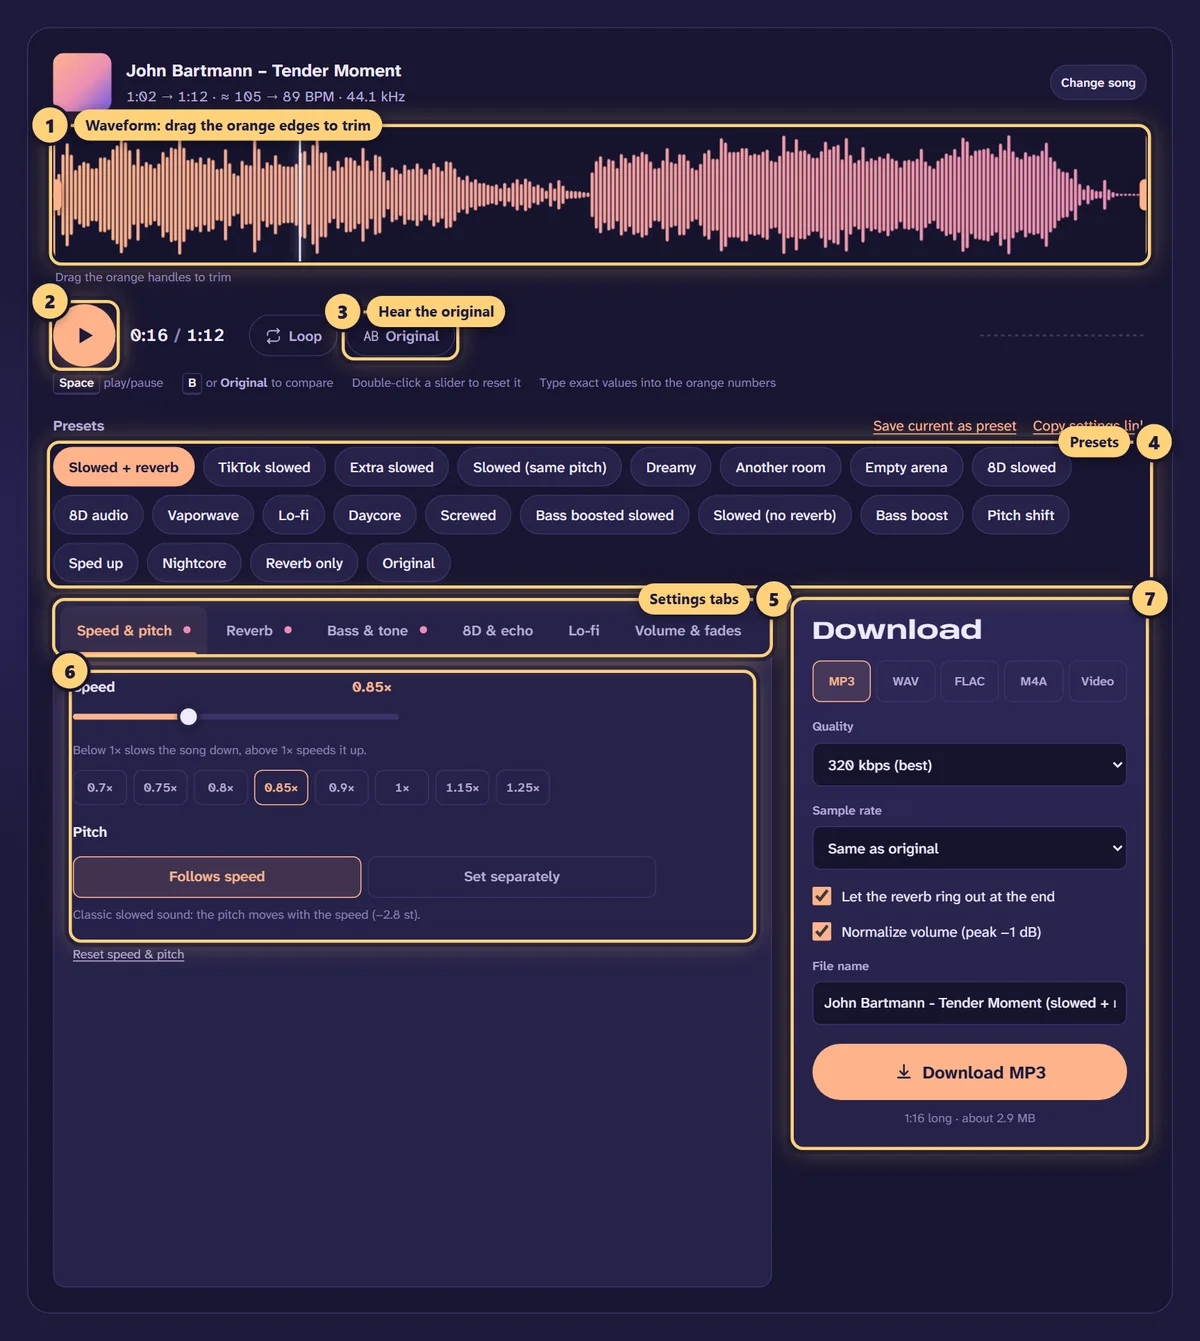
Open the generator and drag the file onto the page, or click “Choose a file”. The waveform appears, the title, artist and cover art are read from the file’s tags, and the Slowed + reverb preset is applied. Press the space bar to play and pause, and the arrow keys to seek.
On a phone
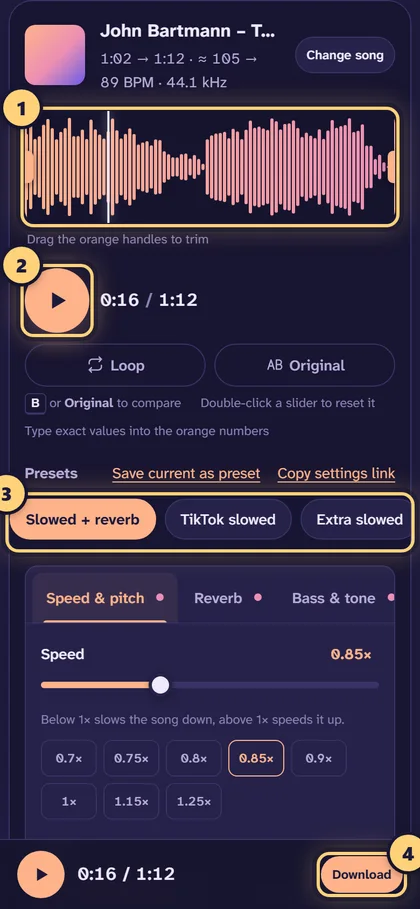
Tap “Choose a file” and pick the song from Files (iPhone) or your downloads or music folder (Android). The play and download buttons stay pinned to the bottom of the screen while you scroll through the settings. Long WAV files use a lot of memory, so on older phones an MP3 or M4A source is more reliable.
Step 3: pick a speed
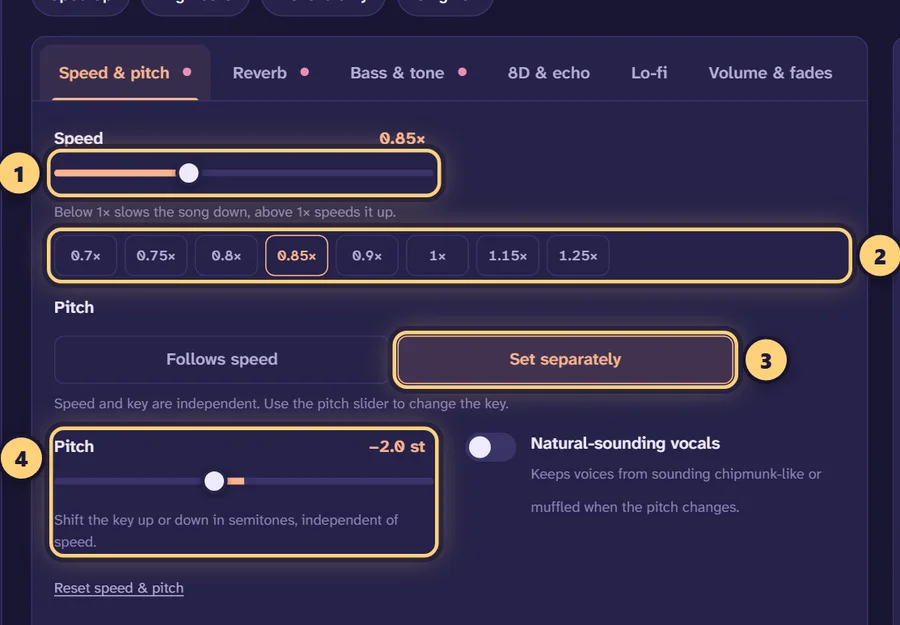
Start with a preset and listen for about 30 seconds before touching anything. The quick buttons under the speed slider cover the common choices: 0.7×, 0.75×, 0.8×, 0.85× and 0.9×. A rough guide:
- 0.85×: subtle and polished. The song is clearly recognisable, about 2.8 semitones lower.
- 0.80×: the heavier sound common on TikTok, about 3.9 semitones lower.
- 0.75× and below: very deep vocals and a dragging groove, closer to vaporwave and screwed styles.
Fast songs can take more slowing than slow ones. A 140 BPM pop track at 0.8× lands at 112 BPM and still moves; a 70 BPM ballad at 0.8× drops to 56 BPM and may start to feel stuck. The tool shows the estimated BPM before and after the change, so you can check this at a glance. For a full table of speeds, semitones and BPM, see the best slowed + reverb settings.
Music: “Tender Moment” by John Bartmann (CC0 1.0). Every version was made with this tool and volume-matched to the original. Switching keeps your place in the song.
Step 4: decide on pitch mode
By default the pitch follows speed, like a record turning slower. That is the classic slowed sound, and most people want it. If the deeper voice sounds wrong for a particular song, switch to Set separately. The tempo then changes on its own, and you can choose any pitch from −12 to +12 semitones. Turn on Natural-sounding vocals in this mode so voices keep their character instead of sounding muffled.
A middle ground that works well: slow to 0.8× with pitch set separately, then lower the pitch by 1–2 semitones. You get the relaxed tempo with a gentler drop in the voice. The slow down song page is set up for this kind of edit.
Step 5: shape the reverb
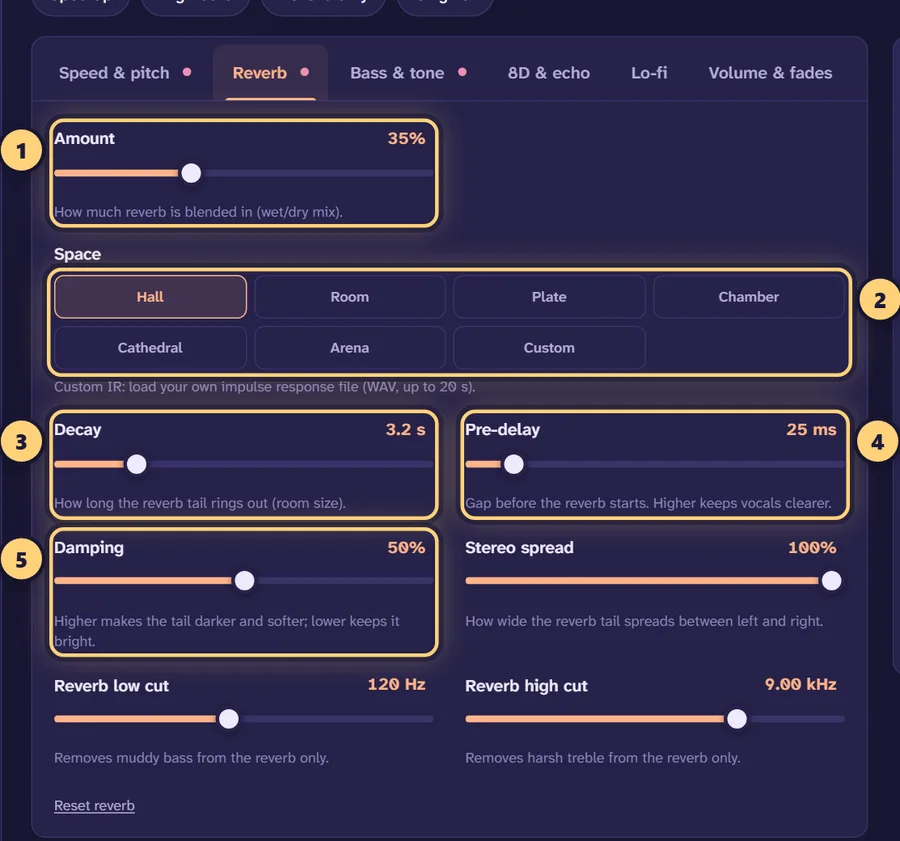
The reverb panel has several controls, but four do most of the work:
- Amount: how much reverb is mixed in. 25–45% suits most songs.
- Decay: how long the tail lasts. 2.5–4 seconds is the usual range; 6 seconds and up sounds huge and dreamy.
- Pre-delay: a short gap before the reverb starts. 20–50 ms keeps words clear.
- Damping: how dark the tail is. Around 50% is natural; raise it if the reverb sounds hissy.
The space (Hall, Room, Plate, Chamber, Cathedral, Arena) sets the character. Hall is the standard choice; Plate is smoother and shinier on vocals; Room is small and close. A useful rule: the slower the song, the less reverb it needs, because the long notes already fill the space. Our page on how to add reverb to audio explains the rest of the controls.
Step 6: add bass, carefully
Slowing a song lowers its bass notes, and many listeners like an extra push on top of that. The classic preset uses +2 dB, the TikTok preset +3 dB. Going above +5 dB makes the mix boomy on most songs, and on phone speakers it can make everything else quieter. If you want a heavy low end on purpose, the bass booster is the place to start, and keep the limiter on.
Step 7: trim and fade
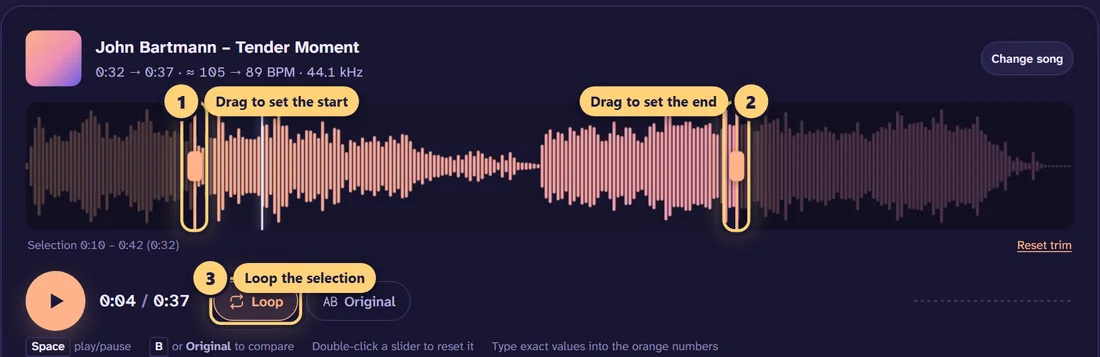
Drag the handles at each end of the waveform to export only part of the song, such as a single verse and chorus for a short clip. Turn on Loop to replay the selection while you fine-tune it. Under Volume & fades, a fade-in of 1–2 seconds softens an abrupt start, and a fade-out of 4–8 seconds works well when you have cut the song mid-section. The reverb keeps ringing naturally after the fade.
Step 8: compare with the original
Press Original, or the B key on a keyboard, to switch between your edit and the untouched song while it plays. Do this every few minutes. After listening to heavy reverb for a while, your ears adjust and you lose track of how much you have added. If the edit sounds washed out next to the original, it probably is. Check the loudest part of the song too, usually the final chorus, because that is where muddiness and distortion show up first.
Step 9: export
| If you want to… | Choose |
|---|---|
| Listen on your phone or share the file | MP3, 320 kbps |
| Use Apple Music or iTunes | M4A (AAC), 256 kbps |
| Edit further in a DAW or video editor | WAV, 24-bit |
| Keep a lossless copy that takes less space | FLAC, 24-bit |
| Post to TikTok, Reels or Shorts | Video, 9:16 |
| Post to YouTube | Video, 16:9 |
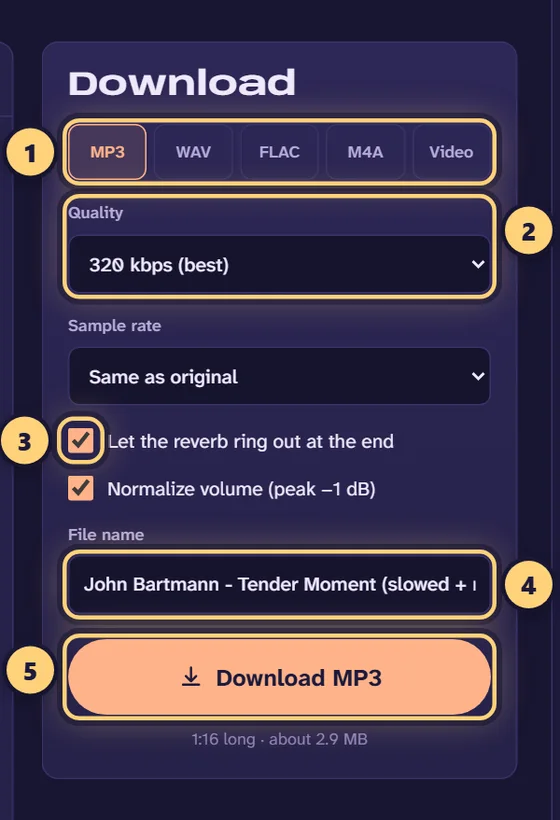
Leave Let the reverb ring out on so the file ends with a natural tail instead of a hard stop. Normalizing to −1 dB is also on by default, which makes the export as loud as it can be without clipping. The export keeps the title, artist and cover art, and the speed change uses a higher-quality resampler than the live preview, so the final file can sound slightly cleaner than what you heard.
Making a video
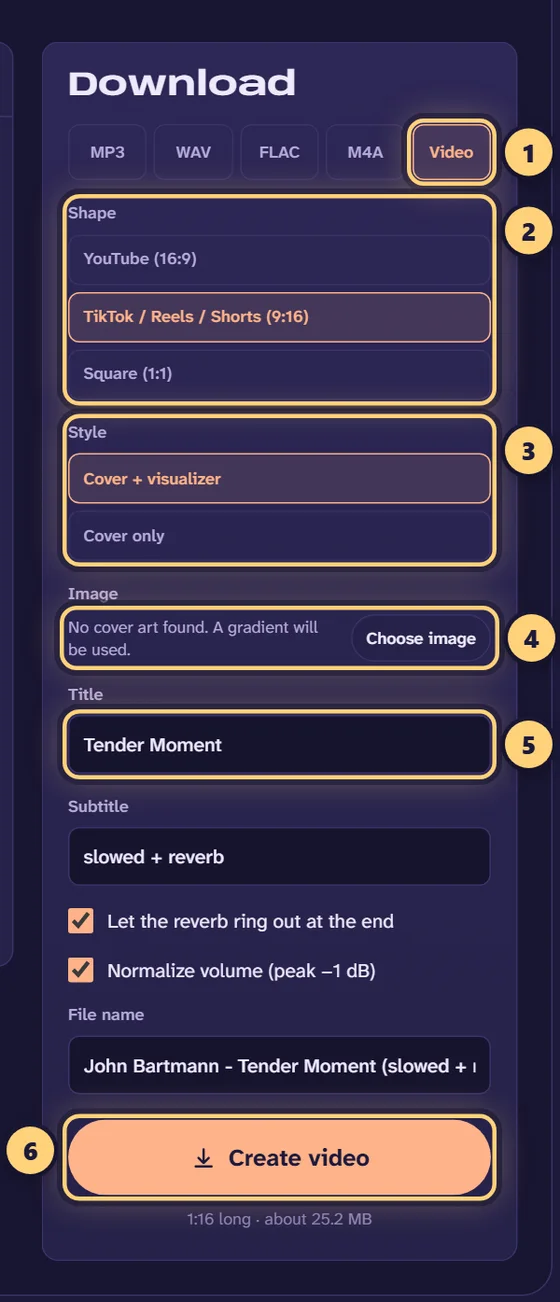
Choose Video in the download panel to make a 1080p MP4. The song’s cover art is used by default, or you can pick your own image or a gradient, add a title and subtitle, and turn on an audio visualizer. Video export works in Chrome, Edge and Safari; in Firefox it depends on your platform. For posting tips, see slowed + reverb for TikTok and YouTube.
Common mistakes and how to fix them
Too much reverb
The most common problem. When the amount goes past about 55%, words blur together and the beat loses its punch. Bring the amount down first, then shorten the decay. If you still want a big, distant sound, use 50–80 ms of pre-delay instead, which adds a sense of size without burying the vocal.
Muddy low end
Slowing pushes bass lower, the bass boost adds more, and reverb smears it all together. Raise the reverb low cut to 200–300 Hz so the reverb only affects the mids and highs, set a low cut of 30–40 Hz on the whole song to remove rumble, and keep bass under +4 dB.
Clipping and distortion
Bass boosts and reverb both add level. If you hear crackly distortion on loud notes, check that the limiter is on and lower the output volume by 2–3 dB. Don’t confuse this with vinyl crackle if you have the lo-fi effects turned on.
Cutting off the tail
If “Let the reverb ring out” is off, or you trim right at the last note, the reverb stops abruptly. Leave the tail option on, or trim a second or two after the final note.
Harsh or hissy highs
Bright reverb on cymbals and “s” sounds can get piercing. Raise damping to 60–70% or lower the reverb high cut to 6–8 kHz. On a low-quality source, lower the main high cut to 10–12 kHz as well.
Slowing too far
Below about 0.75× most voices start to sound like a different, much deeper singer. That can be the point, but if it isn’t what you wanted, go back to 0.8–0.85×, or switch pitch to “Set separately” and keep the drop to a few semitones.
Save your recipe
Once you find settings you like, use Save current as preset to keep them on your device, or copy a settings link to send to a friend. The link shares only the settings, never the audio. Your last song and edit are also restored if you refresh the page on the same device.
A note on copyright
Making a slowed version of a song for your own listening is one thing. Posting it publicly is another, because the original recording and composition still belong to their owners, however much you have changed the speed. Publish edits of music you own, music licensed for remixing, or tracks you have permission to use.